
When I first pointed my telescope at the night sky, I was amazed by the views of the Moon and planets. But it didn’t take long before I began wondering how to increase the magnification of a telescope and push my equipment to show even more detail. If you’ve ever had that same curiosity, you’re not alone. Increasing magnification is one of the most common goals for amateur astronomers, but it’s also one that comes with a few caveats. It’s not just about cranking up the power—it’s about understanding how magnification works and knowing how to maximize your telescope’s potential.
What Is Telescope Magnification?
Magnification is essentially how many times closer an object appears compared to the naked eye. In practical terms, it’s determined by a simple formula:
Magnification = Telescope Focal Length / Eyepiece Focal Length
Let’s say your telescope has a focal length of 1000mm and you’re using a 25mm eyepiece. Divide 1000 by 25, and you get 40x magnification. If you switch to a 10mm eyepiece, you now have 100x magnification. That was the first trick I learned when figuring out how to increase the magnification of a telescope—swap out eyepieces to manipulate the magnification level.
The Role of Eyepiece Selection
Through trial and error, I found that eyepiece selection is one of the easiest and most effective ways to alter magnification. Lower focal length eyepieces yield higher magnification. I started with a 25mm and 10mm eyepiece that came with my telescope, and then added a 6mm eyepiece for those nights when I really wanted to zoom in on Saturn or Jupiter.
However, I also noticed that more magnification doesn’t always mean better views. With a shorter focal length, the image often becomes dimmer and more sensitive to movement. That’s when I learned that it’s not just about boosting the numbers—quality matters more than quantity.
Barlow Lenses: An Amplification Secret Weapon
One of the best investments I made early on was a Barlow lens. This handy device multiplies the magnification of any eyepiece you use with it. A 2x Barlow, for instance, doubles your magnification; a 3x Barlow triples it. So, using a 10mm eyepiece with a 2x Barlow gives you the effect of a 5mm eyepiece without needing to buy another accessory.
At first, I underestimated the value of Barlow lenses. But once I started using them regularly, I realized how versatile they are. With just two or three eyepieces and a good Barlow, I could achieve a wide range of magnifications. That’s a game-changer for anyone exploring how to increase the magnification of a telescope.
Understanding Practical Magnification Limits
Here’s something that took me a while to accept: not all telescopes are built to handle extremely high magnification. There’s a rule of thumb many astronomers use—maximum effective magnification is about 50x per inch of aperture. That means if your telescope has a 4-inch aperture, you shouldn’t expect good results beyond 200x magnification.
I remember the first time I tried to push beyond this limit. I used a high-power eyepiece with a Barlow lens on a humid summer night. The result? A blurry, shaky mess. No amount of gear can compensate for atmospheric turbulence or the limits of your telescope’s optics. Understanding this helped me avoid disappointment and enjoy the clearer, steadier views that my setup could realistically achieve.
Atmospheric Conditions Matter More Than You Think
No matter how much magnification you throw at a celestial object, if the sky isn’t cooperating, your view won’t improve. Early in my stargazing journey, I didn’t pay much attention to weather beyond basic cloud cover. But then I learned about a concept called “seeing,” which refers to the steadiness of Earth’s atmosphere.
On nights with poor seeing, high magnification only emphasizes the instability in the sky. Stars appear to dance, planets shimmer, and images refuse to come into sharp focus. But on nights with excellent seeing, I’ve had breathtaking views of Saturn’s rings and Jupiter’s bands—even at higher magnifications.
These days, I always check seeing forecasts before heading out. Apps and websites like Clear Sky Chart or Meteoblue have become part of my regular observing prep.
Proper Collimation Is Critical
One overlooked aspect when figuring out how to increase the magnification of a telescope is collimation. This is the alignment of your telescope’s mirrors or lenses, and it plays a big role in image sharpness. When a telescope is misaligned, the image degrades quickly, especially at high magnification.
With my Newtonian reflector, I noticed something was off one night when stars wouldn’t focus into tight points. After some research, I realized I needed to collimate. Using a laser collimator, I got everything aligned properly, and the difference in clarity was night and day. Regular collimation is now part of my telescope maintenance routine.
Exit Pupil and Image Brightness
Another factor that affects magnification is the size of the exit pupil, which is the beam of light that leaves the eyepiece and enters your eye. When this beam becomes too small—usually less than 0.5mm—the image dims significantly. This is a common issue with very short focal length eyepieces or high-powered Barlow combinations.
At one point, I used a 4mm eyepiece and found that, while the magnification was intense, the image was barely visible. Dim, blurry, and nearly unusable. Since then, I’ve balanced my eyepiece choices with the goal of keeping the exit pupil in a usable range, typically between 0.5mm and 2mm for planetary viewing.
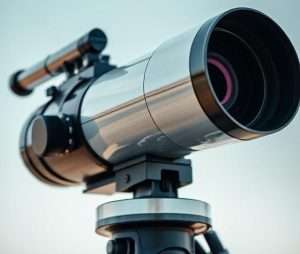
Mount Stability and Focus
When using high magnification, every tiny movement becomes exaggerated. Early on, I made the mistake of using a lightweight tripod with a powerful scope. Even the act of focusing caused the image to wobble so much that I couldn’t get a sharp view. To fix this, I upgraded to a sturdier mount and added vibration pads under the legs.
These changes dramatically improved my observing experience. Now, when I adjust focus or switch eyepieces, the image settles almost instantly, giving me the stable views I need at higher magnifications.
Filters Can Enhance High-Power Viewing
While filters don’t increase magnification themselves, they do enhance the details you can see when using high power. I’ve found that a Moon filter helps reduce glare and improves contrast. Planetary filters, such as red or blue ones, help bring out specific features on Mars and Jupiter.
On nights with good seeing, using filters while magnified allows me to see details like Jupiter’s Great Red Spot or the polar caps of Mars. They’re not necessary, but they can take your viewing to the next level when used appropriately.
Final Thoughts on How to Increase the Magnification of a Telescope
As someone who has spent countless hours under the stars, I’ve learned that figuring out how to increase the magnification of a telescope isn’t about pushing your gear to the limit—it’s about using it intelligently. Magnification can be increased through a combination of shorter focal length eyepieces, Barlow lenses, and stable mounts, but it must always be balanced with conditions, optics, and expectations.
I’ve found that the most rewarding views come when all the factors align: good seeing, proper collimation, stable equipment, and the right magnification for the object I’m observing. Sometimes less is more—lower magnification offers a wider field and crisper image. But when everything is just right, turning up the magnification reveals a level of detail that makes the sky feel within reach.
So if you’re asking how to increase the magnification of a telescope, start with your eyepieces and Barlows, but don’t forget to tune your entire setup. The magic lies not in maximum power, but in mastering your gear and reading the sky like a seasoned observer.


